

How To Build A Natural Stone Garden Wall
C.R. Stone owns and operates C.R. Stone Enterprises in East-Bolton, a landscape and construction company specialising in natural stone.
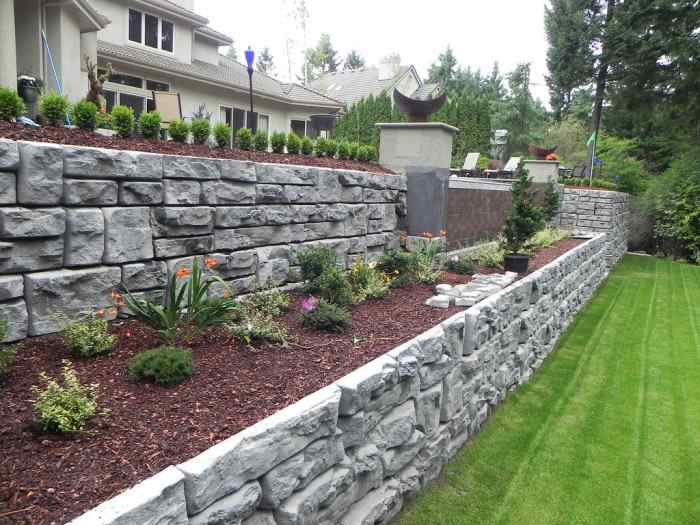
Two-tiered retaining wall in the backyard. Planting flowers and small brushes can soften the look of the stones.
Redi-Rock International/Flickr, CC-BY 2.0
Building a Stone Retaining Wall
As a landscaper and contractor who has built stone creations my whole life (think hundreds of thousands of square feet of stonework), I've handled over a million pounds of stone (so far), and I have found that even some of the most educated advice on how to build a stone wall is not always accurate. In this article, I'll share my secrets to building a dry-stack stone retaining wall that will last a lifetime and fit in perfectly with your landscape and home design.
How to Build a Dry-Stack Retaining Wall
- Plan out the wall's height and base thickness. For every one foot in height, you'll want to lay the base a foot in from the wall's face.
- Prepare a solid foundation or base. Dig out a trench of at least 6-10 inches. This firmly plants the base into the ground below, which helps prevent movement over time. It is also important to consider the material that will hold the base layer and whether it will allow enough drainage.
- Lay the stones, starting with the largest stones on the bottom. The bottom layers will bear the weight of the stones above them. Make sure to lay the stones so that they angle in slightly toward the back of the wall. This will help the wall resist the pressure of the backfill (ground soil behind the wall).
- Protect your wall with backing. Completely cover the back side of the wall to prevent soil and other debris from getting into the wall's crevices. Geotextile fabrics are my go-to; they allow water to drain through but prevent larger materials from getting into the wall.
1. Planning Your Build
Figure Out the Ratio of Height to Base Thickness
Survey the area where you want to build the wall and draw out a plan. How high do you want the wall to be? The rule of thumb is that for every foot of height, you want the same amount of thickness in the base. If your wall will be over five feet high, you can most likely get away with keeping a consistent thickness of 4–5 feet—if you are careful of how the stones in the back are placed.
However, if you are going to be building an 8–12-foot high wall, you're going to want to increase the thickness at the base to at least six or seven feet, keeping it consistent until you reach about half the height of the wall. At that point, you can start tapering in towards the face, ending with a width of 2–3 feet at the top. In all cases, the width at the top of your wall should be around this width—or a little less if you want to do some planting.
Remember that the place you first think of for your retaining wall may not be the only place it can go. Moving a wall out a few feet from a bank may allow you to save material. You can build a shorter wall and keep the same slope, or you can make a more gradual slope by pushing the wall even further out. You can add more soil/gravel behind the wall to fill the gap.
Note: For most DIYers, walls three feet high and below will be manageable. For greater heights, you may want to call in professionals to ensure the wall is built correctly. You may also need to get city approval for walls above three feet in height, depending on where you live.
Slope the Wall Towards the Back
To help the wall hold up to the pressure from the backfill, plan to dig out the foundation and lay the stones so that the stones slope towards the back of the wall—at least a two-inch drop for every foot of height.
Draw a Cross-Section of the Wall
When you draw a sideview of your wall, you should see a triangle shape. Ideally, the area of the triangle should be at least the same as, if not bigger than, the area behind it from the back of the base up. This way, the weight of the stones, along with the inward slope, will allow your wall to withstand the pressure of the backfill.
A Second Tier Needs Additional Planning
If you are planning to build a second tier, you should also draw out where your wall faces and backing will end up, as well as how the upper wall's weight will be distributed to the area below it.
For instance, if you have a four-foot wall in the front, and a second wall in the back that is only three feet behind the finished face of the front wall, the entire weight of the second wall will push against the center of the first wall, causing the wall to bow outwards and eventually crumble. This is because the upper wall is spreading its weight over the area below at an angle of 45 degrees from its edges.
2. Preparing the Base for the Wall
Dig the Foundation
Mark the area where your wall's base will be. You'll then want to dig a trench at least six inches to a foot into the ground, making a slight incline towards the bank (2-inch drop for every foot of wall height). This helps make sure the wall will withstand the pressure from the backfill over time.
Also make sure the surface is even all along the base. Using a square spade can help with this. For larger projects, a tractor may be necessary. You want the foundation stones to be able to lay flat with no room to wiggle.
Choose the Foundation Material
You'll then want to figure out what sort of material will form the base layer. Depending on the area, you may find either regular ground soil, clay soil, or gravel. You may also choose to dig deeper and fill the foundation up to the desired level with one of these materials. I will discuss these materials in more detail below.
Gravel
Gravel is best for water drainage—something you'll want in order to prevent the wall from shifting around. if there is nothing to obstruct the draining process. It should not need much done to it other than a good compacting with a vibrating-plate compactor or jumping jack, depending on the size of wall you're planning to build.
If there are areas that will obstruct the drainage, take care of them by laying a perforated drain tile from the low spot that water will pool in—even if the spot isn't visible on the surface—sloping downwards away from your future wall to an area where collected water can flow away freely.
You won't want to direct drainage from the wall towards your house; steps were taken when your house was built to gather and evacuate water from the edges of your house, so don't compromise what should work. With your gravel base compacted, and potential wet spots taken care of, you're ready to start laying your base rocks.
Clay
Clay will not drain internally. It will need to be either sloped away from the face of your wall so it can drain freely or sloped to the right or left along the face of your wall so that it may drain past one end.
Read More From Dengarden
Many landscapers install drains under their walls when clay is found, but this creates an area for water to collect under your wall, which is the last thing you want. But if there is no other way to drain the water that simple sloping methods will collect, you can install a drain behind your wall.
Put it far enough behind the wall so that your wall will not be resting on the tile, and slope the base very slightly towards the back of your wall to ensure water makes it to the drain and so that the tile you install will direct the water into some area that will never get restricted. Always take steps to prevent sediment from infiltrating your drain (see below).
Soil
Earth and other materials are not the most desirable bases on which to build large stone applications. However, in the following cases, they are acceptable:
- The area to be built on has been undisturbed for many years, has had time to naturally settle, and has an existing slope in front of the area the wall will face.
- The retaining wall will be very short in height and will not weigh down significantly on its base.
- There is mature lawn under the area where the wall will be placed, which has been there for at least a few years and slopes away from the face of your wall. A well-structured lawn is great at evacuating surface water.
However, in most other cases, consider taking steps to ensure that your wall will lie on a solid base. If your wall will be higher than around 24", it will apply a lot of force to the base it lies on, which over the first few years of the wall's life will cause unstable ground to absorb the weight more in some areas and less in others. This will cause your wall to shift or sag and lose its structural integrity.
Because of this, I suggest de-turfing the area, removing light soil or lawn, and adding "clean" drainage material, that is, material that doesn't include pieces under a given size. Many other landscapers don't use clean materials, meaning they include sand and silt that can cause clogging. I use "3/4 clean," which has only 3/4" pieces.
The problem with material that is not clean is that it creates a false base over your problem area by floating on top of existing materials and sealing them off. Clean material, applied in thin layers and compacted in stages, will be absorbed into the existing materials which lie underneath, adding to their ability to perform as an appropriate base.
In most cases, when a two-inch layer of 3/4" clean material is added to and compacted into an earthy base area, the two inches will easily be driven down into the existing material. Additional 3/4" clean material should then be added and compacted to create at least an additional 2" rise from existing levels in front of the future wall face to ensure water can evacuate freely.
In All Cases:
You should ensure that your wall will rest on an area that will slope in such a way that water can naturally escape. The face of your wall will have at least 18" of stable ground in front of it. Erosion will eat away at areas of the ground in front of your wall should there be a significant slope. If there is a slope of up to 25 to 30 degrees, you should have 18" of area directly in front of your wall sloping no more than about 10 degrees.
On any slope of 30 degrees or more, you should have a couple of feet of strong stable ground in front of your wall if you would like it to last any amount of time. You have to keep in mind that the weight of your wall will be forcing down on its base—and not only straight down, but at an angle up to 45 degrees away from your wall's face. You have to be sure that there is sound material in that area in front of the wall to accept the load.
Common Mistakes to Avoid:
- Placing a drainage tile under your wall without complete drain preparation. This allows water to collect and move your wall if even the smallest shift should occur in underlying terrain.
- Burying your base stones beneath the future levels of your finished landscape terrain. This will definitely allow water to gather around and under your base stones and move your wall.
Video: How to Build a Dry-Stack Retaining Wall
3. Laying Stone
Stone Choice and Placement
Your base stones should be your largest stones. They will bear the weight of all the other stones above them and behind them. You should also use similarly large stones behind your base, as well as behind the center sections of your wall. In other words, spread the weight of the stones over each other so that each one helps hold the others in place. This is to create a stronger wall whose stones are tied into each other.
You do have to make sure, however, that all the stones in your wall are laid level. If one stone is laid sloping down towards another, it will be forced down onto it by all the weight placed above it, compromising the entire structural integrity of your wall above that area.
Also, a stone used in the face of the wall, even if it sits flat and level, should not be used if its top surface slopes down towards the front of the wall. The reason is that the stones placed on top will eventually slide down off the wall. I have repaired many walls where the previous masons laid just one stone whose top surface sloped down; that mistake brought down a complete section of a wall.
Something similar but not so drastic happens when a stone's top surface slopes too much inwards, towards the back, and other stones are laid on top of it. The top stones will eventually force that wedge-shaped stone outwards, ejecting it from the face of the wall. At best, this will leave a hole, and at worst, it will cause the whole wall above the hole to collapse.
Structuring a Durable Wall
The trick to getting a wall to last is to tie the stone together and make sure each stone goes back at least 10" deep into the wall. This is the minimum, and you should help this out by adding strong tie stones behind a short stone. Stones will essentially be placed like bricks in a pattern that ties them together. All stones will be in contact with each other, and each one will be forced downward by the stones laid above it.
So if you happen to come across a long narrow stone that has a beautiful face on the long side, don't use the beautiful face on the face of the wall. Unless this stone is as deep as it is long, it's not worth it.
Use it as a "tie rock" instead; display the less-appealing small face on the face of the wall, and let the stone's length reach far back into the wall. Used in this way, this stone will tie into more stones around it and be held in place by more stones above it, guaranteeing you a wall that will last many years.
Learning From Experience
In the Eastern Townships, where I lay wall, many landscapers and stonemasons try to save money by laying the longest faces of the stones as facing to cover more "face footage." When I rebuild these failed attempts at long-lasting walls, I have to bring in more stone to compensate.
Knowlton, in Brome Lake, QC, is littered with hundred-year-old walls; some date even further back. My grandfather, his father, and his father's father spent their lives building stone walls, and the one thing that you'll notice about their walls is that they lasted and are still around.
When helping out my grandfather one day, I observed a true test of his wall's strength, and it wasn't meant to be a test at all. When he laid wall, he would pick up great, big stones—about 80–140 lbs, sometimes bigger—and drop them onto his laid sections of wall where he wanted them to go. If you can drop a 140-lb stone onto any section of the wall that you're building and not cause any structural damage or movement in the wall beneath, you're on the right path.
Remember that the stone you are using has to hold back tons of weight from behind it and on top of it. So a wall built out of five-pound rocks probably won't fare too well over the years if the wall has any height at all. Many of my customers in the Bromont area can tell you about a mason in their area who thought he could pull that off.
4. Protecting Your Wall With Backing
Finally, protect your wall. If you've built a strong wall, there is one thing that can always bring it down: water.
Sooner or later, water will accumulate behind your wall. As long as your backing remains clean of gravel and earth, your wall should fare fine. But if any water running through the wall brings sediment and debris with it, two unwanted things can happen:
- It will cause instability in the ground above your wall as the ground material leaks out through vacant spaces between your wall's stones. This is especially undesirable if you have additional tiers above, as all the preparation you have done to ensure all areas around your wall are sound will be nullified. Your wall may begin moving inwards into the unstable ground, which is better than outwards, but this may shuffle stones in a way that causes the wall to lose strength.
- In colder climates, the material that gets deposited into the center of your backing will retain moisture, and as this material freezes, it will expand, potentially compromising all of your hard work. I have seen this way too many times when the local competition—once again, trying to save money on material—backs their walls with gravel or dirt. These rarely last a winter without bowing substantially, and quite often, simply fall over.
In the worst cases, even a simple rain can cause a wall to crumble. This happens when material behind the wall gets too heavy and pushes out on a wall that has been laid too narrow and with no clean backing.
What's the best way to prevent your stone wall from rain damage?
Back your wall with geotextile. Depending on the region where you live, geotextile may be composed of different materials. But whatever it's made of, you need a product with which to completely cover the back side of your wall; a product that will allow water to flow through it freely but will not allow any solid materials to pass through. This will keep your wall and its backing clean, free of material that might disturb the masterpiece you've created.
And thinking back to your choice of base preparation, you can now see the importance of getting the water out and away from your wall. A substantial amount of water can collect in the area of your new retaining wall, which now forms part of the drainage system of the area.
With this information, you can build yourself a great new retaining wall that will last for decades. And remember that a little extra time or money spent the first time around may save you the inconvenience of a needed second attempt.
Examples of Dry-Stack Retaining Walls
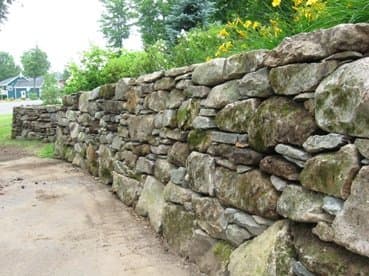
These mossy stones make a new wall in Bromont, QC look as though it has been around for a hundred years. These stones replaced an earlier wall built with stones too small to hold back the bank.
Secrets to Building a Retaining Wall
A retaining wall is a special kind of wall. It has to not only support itself but actively hold back pressure from the material behind it as well. Here are some of the most important things to remember when you're building a retaining wall.
- Choose high-quality stones. The rocks you use, however you use them, have to resist the pressure being applied by the weight behind the wall.
- Build a solid foundation. The weight of the stones will press down on the base material you are building on so that over time, the foundation will shift, compromising the structural integrity of your work. Take the time to build a sturdy, compacted foundation.
- Use shims to prevent other stones from wobbling. As you lay the stone, the stones you place should lay steady and should not wobble. However, stones aren't perfectly shaped, so this is a problem you will encounter often. Use small stone wedges as supports to prevent movement, which will compromise the wall's integrity.
- Make sure there is plenty of drainage. Water collection behind the wall is unacceptable. The increased weight of wet gravel or soil increases the lateral pressure on the wall, increasing the risk of the wall collapsing. This is made worse in areas with frost. As water freezes, it expands, compromising the structural integrity of the wall. Thus, drainage is as important as having a solid foundation.
- Plan carefully when building multi-tiered retaining walls. Before building, make sure to plan out how you will lay each tier to prevent the tiers in the back from adding pressure on the tiers in front.
- Finally, your wall should tie into the landscape design. It should marry well with the design of your house, as well as your lifestyle and personal taste.
This article is accurate and true to the best of the author's knowledge. Content is for informational or entertainment purposes only and does not substitute for personal counsel or professional advice in business, financial, legal, or technical matters.
earthworks auckland on November 04, 2019:
Hey there, first of all thank you so much for this post How to make a natural stone retaining wall and honestly I was searching for the same information from last few days.Keep posting and keep sharing.
http://earthmovingandcivil.co.nz
Randy Ovaskainen on May 23, 2019:
Hello great website with lots of information. My excavation company build a big rock retaining wall and although it looks beautiful, there are rather large gaps between the rocks. What can I do to fill the holes that will last?
Robert on February 26, 2019:
Sir, I am building an amphitheater for a tribal college in Arizona. The amphitheater has a center ceremonial circle that has a radius of 30 feet, with 3 concentric circles raised 8 inches each with a depth of 8 feet.
The base has compacted native soil (much clay) with a 4 inch AB layer, except where the stone will be placed. (The grader left a 2 feet step for us to install concrete footings for block that we decided later not to use) I have ordered quarried Coconino Sandstone to use for these 8 inch retaining walls 10" height, 12"+ depth and 18" to 48" long (before I read your excellent article, I was planning on burying 2" when I install the final surface, 2" Crushed Granite (minus ¼))
The first circle will have 10" height stones, the second circle will have mixture of 10" stones and a 6" stone with a 4" stone on top, the third circle all will be 6"s and 4"s.
Question: What should we do for a base for the stones? Your article suggests ¾" gravel 2" thick compacted with a plate tamper, then another 2" layer of ¾" gravel. Is that correct?
What should we do behind the stones? Geotextile? Then what material ? gravel, AB, Crushed Granite?
Should we install a drainage tube behind the stones?
After a recent rain the water drained off the circle with no standing water. Thank you for your time and advice.
Ronald Hatala on September 17, 2018:
I told you the wrong dimensions It's 110' long and 4'high.
Ronald Hatala on September 17, 2018:
I built a summer home in western North Carolina 20 years ago. I unfortunately used railroad ties for the retaining wall and steps. They are now rotting and I need to replace them. My trade was stucco and plaster and after reading your article I can see you know your stuff. I want to do it the right way. My wall is 110', starting at 4' and goes to 10' at the corner and then back down to 4'. I have had contractors for large cement block to large boulders. What would you recommend for this type of wall.? Also what would you estimate a wall like this would cost (ball park) I want to make sure I'm not getting ripped off. Any tips or suggestions would be greatly appreciated. Like I said I want to do it the right way this time. I'm concerned I may loose my covered porches.
Thank you for any help you can give me
Ronald
Dj on June 29, 2018:
This was so much more insightful than the average 10 point wiki how to. The depth of your knowledge and experience on this craft is obvious. Thank you for sharing it.
Dan Welsh on December 09, 2017:
Thank you for sharing your hard won secrets. Any pictures of a prepared base would be very helpful for us weekend warriors who really want to do it right. The comments on tieback stones were a revelation. The photos of your finished walls are inspiring... time to go move some stone.
Partne Daugherty on August 28, 2017:
Please post pics so that us novice understand accurately and apply technique correctly.
Linda Rosewall on December 05, 2016:
Thankyou for your insights on the proper way to make a stone wall.
I am surrounded by stone walls here in Italy and need to replace a 1.5 meter tall retainer way because of poor drainage and improper concrete decorative made on top of the stone.
I believe this decorative technique of simulating tree branche and bark in cement dated back to 40s or 50s. It has a similar look to the architecture of Gaudi.
I plan to remove the building cement to be able to access the stone work behind.
This retention wall is only 1.5 meters high and 8-10 meters long and supports three massive cedar trees above.
The rooting system is also applying pressure to the wall.
I am able to send photos if you dont mind having a look.
Your comments would be invaluable..
Grazie Mille!
Saluti,
Linda Rosewall
Guyasuta on November 18, 2016:
I am not a landscaper, but I have build numerous retaining walls, single-, double- and triple- tiered, almost exactly as you describe. I have a woodland behind my house there is an old now dry rocky creek bed down a hundred-foot slope in the woods behind my house. I cannot tell you how many boulders I have dug out and rolled, slowly and painstakingly, uphill to where they became retaining walls, steps, terraced tiered sitting walls and stone paths. It has been a twenty year labor of love. Now I am planning to build a three-level terraced retains wall interrupted by stone steps where my back slopes abruptly into the woods. Do I wish you were in my Western Pennsylvania, U.S. neighborhood, because I could use a little expertise and a little more muscle! Incidentally, if you, or anyone wants to invent a fabulous machine for a landscaper, might I suggest a sturdy stainless steel battery powered, self-propelled wheelbarrow. That machine alone, if it existed, would have saved me countless hours of human powered drudgery.
RobB on November 14, 2016:
I live in old bluestone quarry land with unlimited supply for walls and sculpture. Your writing is clear and fun to read, and I'll benefit from your advice and experience.
Barac on June 21, 2016:
Hey just wondering if you could give me a few pointers on a wall that I am planning on building. The wall is 1mtr high and runs for 22mtrs. The wall is currently held by a wooden retaining wall but this has been under engineered with small polls so the wall needs replacing. The wall will be holding up our parking area behind our house so we want to make sure that we do the new wall properly and use the correct material. Can you please advise me on the size stone I should be using for this wall. We were considering using 200lb stone but are now thinking that we might need to use 600lb stone and use a machine to lift the stone into place. Do you think that 200lb stone would do the job or are we best to use large 600lb stone for the base layer considering that the wall will have a gravel parking area above it?
Also we are planning on using basalt stone for the wall which is very dense and heavy. Do you have any types of stone that you recommend using for stone walls?
Thank you
James Jones on May 26, 2016:
Wow, these walls are beautiful. Where do you get all the stones? Do you hunt for them or do you buy them from dome type of supplier?
Michele on November 08, 2015:
Beautiful wealth of information here. Love your passion for stonework; as I have only recently began to discover the joys and difficulties of the medium. Excellent advice throughout your writings.. .Thank you sir :)
Dan Miller on April 14, 2014:
I too live in East Bolton, (albeit in the UK) and have found your information both informative and inspiring.
Thanks alot.
Dan bird on March 06, 2014:
It's a shame no one told you the number 1 rule about stone, no running joints, you should start and add that to your list
Better Yourself from North Carolina on June 05, 2012:
We've thought about having a stone wall added to our landscaping - this is very helpful info! And your stone work is beautiful - thanks for sharing!
C.R. Stone (author) from East-Bolton on August 13, 2011:
Your right. Things that last forever take time and money. There's a lot of poor workmanship in today's walls to cater to the client's budgets, but they won't last forever either.
mike on August 07, 2011:
its nice to see that there is still some people who like to do things the right way and have pride in there work.
with our economy nobody wants to pay to have it done right.
C.R. Stone (author) from East-Bolton on March 12, 2011:
Thank you.
stars439 from Louisiana, The Magnolia and Pelican State. on March 12, 2011:
Your work is beautiful, and very professional. Excellent hub, and awesome photographs.
How To Build A Natural Stone Garden Wall
Source: https://dengarden.com/landscaping/How-to-make-a-natural-stone-retaining-wall
Posted by: nolandrowend.blogspot.com
0 Response to "How To Build A Natural Stone Garden Wall"
Post a Comment